SelfTechy

A portal for self learning

Working with Arrays and Objects in Javascript


Arrays

Arrays in JavaScript are a data structure that allows you to store multiple values in a single variable. The values can be of any type, including numbers, strings, or even other arrays.

To define an array, we can either use brackets or object notation.

ArrayExamples.js

let studentsArr = ["Manisha", "Giridhar", "Shivakumar", "Seetaram"];
let studentIds = new Array(121,122,123,124,125,126);

console.log("----------------------------------------");
console.log("Students IDs");
console.log("----------------------------------------");

for(let i=0;i<studentIds.length;i++){
    console.log(studentIds[i])
}

console.log("----------------------------------------");
console.log("Students Array");
console.log("----------------------------------------");
for(let key in studentsArr){
    console.log(studentsArr[key]);
}

There are several built-in methods for manipulating arrays, such as push(), pop(), shift(), and unshift(), that allow you to add or remove items from the array.

Using the above methods we can use the arrays as Stack, & Queue.

Below are some examples:

/**
 * The stack is a linear data structure  
 * that is used to store the collection of objects.
 * It is based on Last-In-First-Out (LIFO).
 */

//Let us take the example of Received Phone calls

let receivedCallsStack = [];

receivedCallsStack.push("First Call");
receivedCallsStack.push("Second call");
receivedCallsStack.push("Third call");
receivedCallsStack.push("Fourth call");

for(let key in receivedCallsStack){
    console.log(receivedCallsStack);
}

console.log("Most recent call is from: "+receivedCallsStack.pop());
console.log("Second most call is from: "+receivedCallsStack.pop());
/**
 * A queue is a linear data structure that stores the elements sequentially.
 * It uses the FIFO approach (First In First Out) for accessing elements.
 */

// Let us take the example of Cashier line in a store

class CashierLine {
    constructor() {
        this.customers = [];
    }
    
    // Customer stands in the line
    standInQue(customer) {
        return this.customers.push(customer);
    }
    
    // Customer moves out from the Line
    moveOut() {
        if(this.customers.length > 0) {
            return this.customers.shift();
        }
    }
    
    // view the last person in the queue
    peek() {
        return this.customers[this.customers.length - 1];
    }
    
    // check if any customer is present in the line
    isEmpty(){
       return this.customers.length == 0;
    }
   
    // the size of the queue
    size(){
        return this.customers.length;
    }
 
    // empty the queue
    clear(){
        this.customers = [];
    }
}

let cashierLineQueue = new CashierLine();
cashierLineQueue.standInQue("Customer1");
cashierLineQueue.standInQue("Customer2");
cashierLineQueue.standInQue("Customer3");
cashierLineQueue.standInQue("Customer4");
console.log(cashierLineQueue.customers);

cashierLineQueue.moveOut();
console.log("Customers in the queue: ");
console.log(cashierLineQueue.customers);
console.log("Last person in the queue: ");
console.log(cashierLineQueue.peek());
console.log("Check if the queue is empty: "+cashierLineQueue.isEmpty());

console.log("No of people in the line: "+cashierLineQueue.size());

cashierLineQueue.clear();
console.log("No of customers after the queue is cleared: "+cashierLineQueue.customers.length);

Objects

JavaScript objects are key-value pairs that represent data in a structured manner. They allow developers to store and manipulate data in a structured and organized manner. An object in JavaScript is a collection of key-value pairs, where each key represents a property of the object, and its corresponding value represents the data associated with that property.

There are two ways to create an object in JavaScript: using object literals and using the object constructor.

let person = {
  name: "John Doe",
  age: 30,
  address: {
    street: "123 Main St",
    city: "New York"
  }
};
let person = new Object();
person.name = "John Doe";
person.age = 30;
person.address = {
  street: "123 Main St",
  city: "New York"
};

In conclusion, objects are a powerful feature of JavaScript and allow developers to store and manipulate data in a structured and organized manner.

Javascript–Variables and Data Types


Javascript is a Dynamically Typed language meaning the Interpreter assigns variables a type at runtime based on the type of data in the variable at that time. Javascript is one of the dynamically typed or untyped languages.

How do we declare the variable in Javascript. Very simple!! No need to mention the type of variable.

Example:

//string

let studentName = “Raghu”;

There are 8 basic data types in Javascript.

Seven primitive data types:

  1. number – numbers of any kind (integers or floating point)
  2. Bigint – for integer numbers of arbitrary length
  3. string – for strings
  4. boolean – for true/false
  5. null – for unknown values
  6. undefined – for unassigned values
  7. symbol – for unique identifiers

Non-primitive data type:

  1. Object – for more complex data structures

In the below example, let us see how the variables for the above data types are declared and used:

alldatatypes.js

[dm_code_snippet background=”no” background-mobile=”no” bg-color=”#abb8c3″ theme=”dark” language=”javascript” wrapped=”no” copy-text=”Copy Code” copy-confirmed=”Copied”]

//Below are the primitive data types

//string
let studentName = "Raghu";
//number
let studentId = 215;
let passPercentage = 89.85;
//boolean
let isPass = true; 
//BigInt
let bigInt = 1234567890123456789012345678901234567890n;
//null
let address = null;
//Undefined
let marks;
//Symbol
let symbolId = Symbol("id");

console.log("Data type of -- studentName is: "+typeof(studentName));
console.log("Data type of -- studentId is: "+typeof(studentId));
console.log("Data type of -- passPercentage is: "+typeof(passPercentage));
console.log("Data type of -- isPass is: "+typeof(isPass));
console.log("Data type of -- bigInt is: "+typeof(bigInt));
console.log("Data type of -- address is: "+typeof(address));
console.log("Data type of -- marks is: "+typeof(marks));
console.log("Data type of -- symbolId is: "+typeof(symbolId));

[/dm_code_snippet]

Index.html

[dm_code_snippet background=”no” background-mobile=”no” bg-color=”#abb8c3″ theme=”dark” language=”markup” wrapped=”no” copy-text=”Copy Code” copy-confirmed=”Copied”]

<html>
    <head>
    </head>
    <body>
    </body>
</html>
[/dm_code_snippet]

Console Output

datatyperesponseconsole

In the first screenshot which is of the Javascript file. We can see for every data type, variable declaration is same. I have just used the “let” keyword. Simple right??

IDE for Javascript and Typescript


Anyone coming from Java background mostly will be using either Eclipse or IntelliJ Idea. For automation testing with tools like Cypress and Playwright with Javascript it would be good to use Microsoft Visual Studio Code. My favourite IDE for automation with Javascript is VS Code. Let us see how to start using it.

Download VS Code from here.

Double click the downloaded EXE and Install by clicking next button.

vscodeinstall

Once installed, open the Visual Studio Code. It should look like below:

vscodeinstalled2

Below are some plugins which will be useful for Javascript & Typescript development.

  1. Prettier – Code formatter
  2. Live Server
  3. JavaScript (ES6) code snippets
  4. GitLens — Git supercharged
  5. ESLint

You can install these plugins by clicking the plugins Icon as below:

vscodeplugins

Once the installation of plugins is done, restart the VS code. Now, you are ready to develop Javascript & Typescript.

Refer the documentation here for any more information on Microsoft Visual Studio Code.

Javascript–first program


Okay, let’s start writing Javascript!!

helloworldjs

indexhtml

There are two code snippets here, first one is JavaScript and second one is HTML. Write both these in a Notepad and save as index.html and simplejs.js. Keep both in the same folder and open the html file in a browser.

When the file opens, it will be blank. Right click on it and select inspect and then click console.

You can see the output as below:

browserconsole

Learning Javascript and Typescript for Test Automation


In the Information technology industry, there is a constant upgradation of tools and technologies every year. As IT professionals, we need to upgrade ourselves as well. For example, most of the big businesses are moving towards cloud because of its high scalability and low cost. Devops and DevSecOps have become de facto standards. In the software testing space as well, there are bunch of new tools developed for test automation.

For about a decade HP QTP and then Selenium ruled the Test Automation space. For software quality professionals, knowing these tools for test automation would have been enough. But now there are bunch of new tools which are better than previous ones. To upgrade ourselves to new tools we may need to learn new programming languages like Javascript.

If we are good at one programming language such as Java, is it difficult to learn a new one like Javascript? Not so much!! But since they are developed for different purposes, there are specific features.

So, when I learnt Javascript it was not much difficult but often confusing while using the features like:

  • Promises
  • Arrow functions
  • Asynchronous functions etc

So, as a Software Test Engineer I thought of writing some articles on Javascript and Typescript concentrating more on the features which are very much required for automation development.

There are many YouTube videos, Udemy courses, tutorials, etc but all of them explain every feature of Javascript in detail. That would be good for a front-end developer. For a person who comes from Java background might get confused. So, we will start learning Javascript & typescript from the next blog onwards.

bWAPP (Buggy Web App) – Installation and configuration on Windows


Students, developers and security enthusiasts can learn the theoretical part of the web application penetration testing but how do they practice. Legally, trying hacking skills on the random web applications available on the internet is criminal offense.

For the purpose of practicing hacking, there are web applications developed with deliberately introduced bugs. Buggy Web App (bWAPP) is one of such applications. bWAPP has over 100 security vulnerabilities. It covers all the risks from OWASP top 10 project.

Goal of this application is to provide legal and secure environment for practicing web application penetration testing skill.

bWAPP is developed using PHP and MySQL. So, to install this application we need a web server and database server.

In this post, we are going to learn how to install this application on windows operating system.

Download bWAPP here

Click the download link in the above picture

Download XAMPP here

Click the download link for the latest version of XAMPP windows 64 bit

Installing and configuring XAMPP

Double click the downloaded EXE file and click next button. This will take you through the whole process of installation. I always keep installing any software in D: drive not in C: drive where operating system is installed.

Keep the default settings and just change the installation driver to D: (D:\xampp). This will install the XAMPP on to the windows. Now, go to D:\xampp folder and see lot of folders & files are being installed here. Under this folder there is xampp-control file. Double click this file and start the xampp-control panel which looks like as below.

XAMPP Control Panel

Look at the above picture that shows different stuff Apache, MySQL, FileZilla, Mercury & Tomcat. What are these?

  1. Apache – Web server
  2. MySQL – Database server
  3. FileZilla – FTP server
  4. Mercury – Mail server
  5. Tomcat – Application server

To run a simple web application web server and database servers are required. Apache web server & MySql serve this purpose. We will not go in detail into the other applications which are installed with xampp.

This completes the installation of the xampp. Let us go to the installation and configuration of bWAPP application.

Installation of bWAPP

Extract / unzip “bWAPP_latest.zip” and then copy the “bwapp” folder to D:\xampp\htdocs (C:\xampp or D:\xampp depending on your installation)

Refer to these below pictures.

After copying the bWAPP folder into the “htdocs” folder, go to “admin” folder inside the bwapp folder as in the below picture.

Open the “settings.php” file in a notepad and search for $db_password = “bug”. Remove the “bug” and make it blank as below.

Now, configuration of the bWAPP application is ready. We need to do the installation part. For that the XAMPP control panel needs to be started and then start both:

  1. Apache web server
  2. MySql database server

To start the XAMPP control panel –> go to xampp installation folder (C:\xampp) –> double click “xampp-control” application file. This will start the xampp control panel as below.

Click “start” for both Apache and MySql servers. After the start, both the buttons become “stop” and the status of the applications is changed to “running”.

Open a browser (chrome/firefox) and then open the URL: http://localhost:80/bwapp/install.php and then continue with installation of the bwapp application by clicking the “here” as in the below picture.

After clicking the link “here” bwapp gets installed successfully. Now click “login” button and enter username as “bee” and password “bug” –> login

This completes successful installation and login to bWAPP application. Application is ready!! start hunting for vulnerabilities. All the best!!!

Setting up Protractor with latest Eclipse (Windows) – Plugins & Settings


I have seen in case of many of the technologies, blogs and other contents on the internet becomes obsolete over time. After update setting up tools and plugins become entirely different. When a newbie tries to start with faces issues and the internet does not help. Takes lot of time.

In case of Protractor and Eclipse setup, I have observed the above situation. I am going to explain here how to setup protractor with the latest eclipse.

Protractor test automation is done using different IDEs. Mainly,

  • Visual studio Professional
  • Visual studio code
  • Eclipse
  • Sublime Text
  • Atom Editor
  • Webstorm

Most of them who have used Java for test automation with Selenium will definitely prefer using Eclipse. So am I.. 🙂

Download latest Eclipse (current version Eclipse 2019-09). There are different versions of eclipse. Select one of the below three (I would say the first one – Eclipse IDE for Java Developers)

  • Eclipse IDE for Java Developers
  • Eclipse IDE for Enterprise Java Developers
  • Eclipse IDE for Javascript and Web Developers

Make sure that Java 1.8 or higher is installed on your machine which is absolutely required for eclipse installation.

Create two different folders in your D: drive (drive other than having operating system)

  • EclipseInstallations –> eclipse201909
  • EclipseWorkspaces –> ProtractorAuto

This is done just to have a structured way. You can create your own folders and subfolders.

Once the download is done, double click the exe file and then select the folder where the eclipse should be installed. Then click install button.

After installation, select the workspace and launch the eclipse.

For installing new plugins we need to go to Eclipse marketplace and select the required plugins. Below are the two plugins required for protractor. Open eclipse — > Help –> Eclipse Marketplace –> Search below plugins –> click Install (select I agree for license)

  • Wild Web Developer (previously AngularJS)
  • Nodeclipse.github.io

Launch the eclipse after completing the installation of both the plugins. Try to create a new project which should show below options.

  • Javascript
  • Node

Now, the eclipse IDE setup is completed. What else is required to start with writing protractor test automation scripts?

  • NodeJS
  • npm
  • Protractor

Download NodeJS from here and then install by double clicking the msi file (download 12.13.1 LTS). Verify the installation of node and npm by executing the below commands in the command prompt.

  • node –version
  • npm –version

Install protractor:

npm install -g protractor

Update the webdriver-manager by executing the below command:

webdriver-manager update

Verify the installation of protractor and webdriver with the following commands.

  • protractor –version
  • webdriver-manager status

This completes the installation and setup of protractor with eclipse. Now, we will go ahead and write a simple test script and run.

After completion of the setup we need to create a new Javascript project and run tests. That should be the end of basic setup. Okay, let us go ahead!!

Open Eclipse –> Create new Javascript project –> name as “learnprotractor”

Add two of the javascript files:  conf.js and example_spec.js

conf.js

[dm_code_snippet background=”yes” background-mobile=”yes” bg-color=”#abb8c3″ theme=”dark” language=”php” wrapped=”no” copy-text=”Copy Code” copy-confirmed=”Copied”]

// An example configuration file.

exports.config = {
  directConnect: true,

  // Capabilities to be passed to the webdriver instance.
  capabilities: {
    'browserName': 'chrome'
  },

  // Framework to use. Jasmine is recommended.
  framework: 'jasmine',

  // Spec patterns are relative to the current working directory when
  // protractor is called.
  specs: ['example_spec.js'],

  // Options to be passed to Jasmine.
  jasmineNodeOpts: {
    defaultTimeoutInterval: 30000
  }
  
};

[/dm_code_snippet]

example_spec.js

[dm_code_snippet background=”yes” background-mobile=”yes” bg-color=”#abb8c3″ theme=”dark” language=”php” wrapped=”no” copy-text=”Copy Code” copy-confirmed=”Copied”]

describe('angularjs homepage', function() {
  it('should greet the named user', function() {
    browser.get('http://www.angularjs.org');

    element(by.model('yourName')).sendKeys('Julie');

    var greeting = element(by.binding('yourName'));

    expect(greeting.getText()).toEqual('Hello Julie!');
  });

  describe('todo list', function() {
    var todoList;

    beforeEach(function() {
      browser.get('http://www.angularjs.org');

      todoList = element.all(by.repeater('todo in todoList.todos'));
    });

    it('should list todos', function() {
      expect(todoList.count()).toEqual(2);
      expect(todoList.get(1).getText()).toEqual('build an AngularJS app');
    });

    it('should add a todo', function() {
      var addTodo = element(by.model('todoList.todoText'));
      var addButton = element(by.css('[value="add"]'));

      addTodo.sendKeys('write a protractor test');
      addButton.click();

      expect(todoList.count()).toEqual(3);
      expect(todoList.get(2).getText()).toEqual('write a protractor test');
    });
  });
});

[/dm_code_snippet]

Create one more file: testrunner.bat (windows batch file)

[dm_code_snippet background=”yes” background-mobile=”yes” bg-color=”#abb8c3″ theme=”dark” language=”php” wrapped=”no” copy-text=”Copy Code” copy-confirmed=”Copied”]

set PATH=%PATH%;C:\Users\{InsertUsernameHere}\AppData\Roaming\npm;C:\Program Files\nodejs
protractor conf.js

[/dm_code_snippet]

Eclipse project should look like below screenshot:

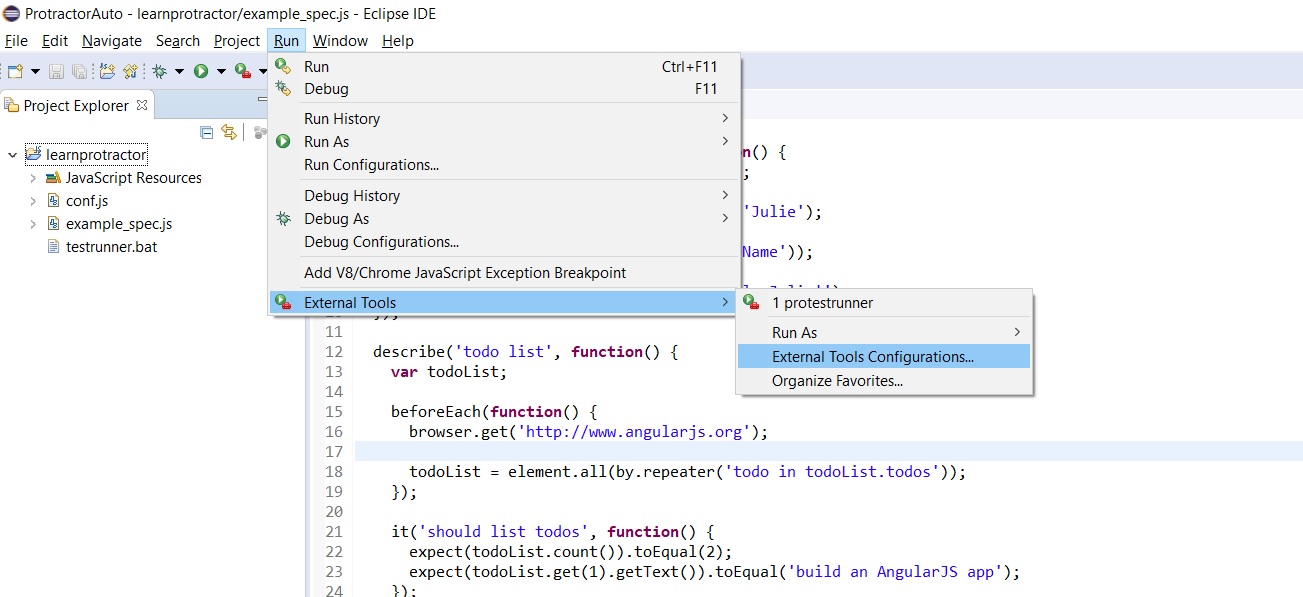
Add a run configuration:

  • Go to Run –> External tools –> External tools configuration
  • Click Program –> New button (“+” symbol on left top) –> this creates a new run configuration (refer below screenshot)
  • Click “Browse workspace” and select “testrunner.bat” file
  • Click “Browse workspace” and select the “Working directory” (learnprotractor)
  • Provide the name for this runner as “protestrunner”
  • Click Apply and close 

As in the above picture, click the “protestrunner” external run configuration. This will run the sample test. I hope this will help to setup the protractor with eclipse and run a sample test.

Robotframework – Working with Date and Time


Robot framework provides keywords for lot of stuffs. Framework has very good documentation. Here I am going to explain how do we handle situations with date and time. The library in Robot framework for handling time is “DateTime”. This library needs to be added to the settings before using the keywords for date and time. In automation we come across problems to get or set date in various formats. Sometimes we need to add or subtract some number of days or hours or minutes to some given date. All these are well handled with different keywords provided by this library.

Keywords:

  1. Add Time To Date – Adds given time to the Date.
  2. Add Time To Time – Adds time to given time and returns result time. Both the arguments are time
  3. Convert Date  – Converts the date between supported date formats
  4. Convert Time – Converts the time between supported time formats
  5. Get Current Date – Returns the current date. We can specify the format with result_format argument
  6. Subtract Date From Date – Subtracts date from the date and returns the resultant date.
  7. Subtract Time From Date – Subtracts the time from the date and returns the resultant date.

Printing Day, Month, Year, Hour, Minute, and Seconds using Get Current Date and Convert Date keywords

*** Settings ***
Library  DateTime


*** Test Cases ***
Manipulate Current Time test
    Manipulate current time
    
*** Keywords ***
Manipulate current time
    ${CurrentDate}=  Get Current Date  result_format=%Y-%m-%d %H:%M:%S.%f

    ${datetime} =	Convert Date  ${CurrentDate}  datetime
    Log  ${datetime.year}	
    Log	 ${datetime.month}
    Log	 ${datetime.day}	
    Log	 ${datetime.hour}
    Log	 ${datetime.minute}
    Log	 ${datetime.second}
    Log	 ${datetime.microsecond}
    

In automated testing we might need to generate date and time values dynamically. For example, add one hour for the current time and generate the new time or add 30 minutes to the current time and get the new time. This can be accomplished using Add Time To Date keyword. Look at the below example:

*** Settings ***
Library  DateTime


*** Test Cases ***
Manipulate Current Time test
    Manipulate current time
    
*** Keywords ***
Manipulate current time
    ${CurrentDate}=  Get Current Date  result_format=%Y-%m-%d %H:%M:%S.%f

    ${newdatetime} =  Add Time To Date  ${CurrentDate}  2 days
    Log  ${newdatetime}
    ${newdatetime} =  Add Time To Date  ${CurrentDate}  2 hours
    Log  ${newdatetime}
    ${newdatetime} =  Add Time To Date  ${CurrentDate}  30 minutes
    Log  ${newdatetime}
    ${newdatetime} =  Add Time To Date  ${CurrentDate}  30 seconds
    Log  ${newdatetime}

Report:

DateAndTimeReport

There is one more way to add time to the current date. Using result_format=%H, get the current hour of the date. Convert that to integer and add required number of minutes to it. But in this way of getting new time there is a glitch. If you add 10 minutes to 55 then this gives us the result as 65 not as 05. We will go through the below code and try to understand.

*** Settings ***
Library  DateTime


*** Test Cases ***
Manipulate Current Time test
    Manipulate current time
    
*** Keywords ***
Manipulate current time
	 ${hour}=   Get Current Date   result_format=%H
	 ${hour}=   Convert To Integer   ${hour}
	 ${min}=   Get Current Date   result_format=%M
	 ${min}=   Convert To Integer   ${min}
	 ${minmodified}=   Evaluate   ${min}+55
	 ${hourmodified}=   Evaluate   ${hour}+2
	 Log  ${hourmodified}
     Log  ${minmodified}

Report:

WrongMinUpdateIf we use the above method then we need to handle the special cases such as hour going beyond 24 and minutes going beyond 60. Hence, I would prefer to use the first one than the second one. I would say using keywords for subtracting time from the date and time are not tough after understanding how to use the keywords for adding the date and time to the given date. Try to work on keywords and comment on this post.

SOAP Web services


Introduction

Web service is a well-defined, self-contained software function provided over the internet. The web service is explained in detail in this post (link to post) that explains questions such as "What is a web service?", "What are the components of a web service?", etc.

Background

Enterprises containing existing legacy applications and databases might need to exploit the new technologies in order to serve their business needs. For example an Enterprise in Retail space would have been using several applications erstwhile for their business need. But if it wants to move on to multichannel retail then software which suites that purpose have to be explored and adopted. Here the existing applications have to be maintained as well as new applications needs to get integrated. Then the need for EAI (Enterprise Architecture Integration) comes into picture. Several integration technologies have been used in Enterprise Architectures. EAI (Enterprise Architecture Integration) is a term used for creating plans, methods and tools for modernizing and consolidating the applications in enterprises. Service Oriented Architecture (SOA) is one of the integration method used in EAI. In SOA web services are used for integration.

Types of Web Services:

There are basically two types of web services.

  1. SOAP (Simple Object Access Protocol) web service
  2. RESTful (Representational State Transfer) web service 

In this post, we will be discussing SOAP web service in detail.

SOAP is a protocol used for accessing the web services. A web service which implements the standards of SOAP are named as SOAP web services. XML is used as its message format for communication. Since XML is language and platform independent SOAP web services facilitate communication between heterogeneous software components of an Enterprise Architecture. WSDL (Web services definition language) is used to describe the interface provided by the web service.

SOAP specification defines the messaging framework consisting the below:

  1. Processing model
  2. Extensibility model
  3. Underlying protocol binding framework
  4. Message construct

Processing Model

Below figure depicts the SOAP processing model

SOAP_Processing_model 


SOAP processing model describes how a SOAP message is passed on to its destination, i.e. Ultimate SOAP receiver, from the Initial Sender; SOAP nodes; SOAP message path and how a receiver processes the SOAP message. SOAP provides a distributed processing model and hence before reaching the final node it might also go through some intermediary nodes.

  • SOAP Nodes: A SOAP node can be the initial sender or ultimate receiver or the intermediary node which acts as both receiver and sender. The ultimate SOAP receiver has to process the SOAP message according to the processing model.
  • SOAP Actors and SOAP Nodes: In processing a SOAP message SOAP nodes are said to be acting as SOAP actors. These are identified by an URI known as the SOAP actor name. Purpose of the SOAP actor name is to identify the SOAP node.
  • SOAP Header Blocks: Header elements are optional and are added if there are any special requirements. For example, if the "Actor" attribute is specified in the header then it means that particular actor is going to perform some action on the SOAP message and then forward it to the next node. Digital signature can be specified for any password protected service. If the actor attribute is not specified then it is assumed that the ultimate SOAP receiver is the target node. If the "mustUnderstand" node is set to "true" then the header block is mandatory.
  • Process the SOAP messages as per the standards

Example:

soap_mustunderstand_example

Message Format:

SOAP message is an XML document containing the various elements as explained below:

SOAP_Message_inputXml

  • Envelope: This field is mandatory in the XML document. Defines start and end of the message. Also, this is used to identify the XML document as a SOAP message.
  • Header: This field is optional. This part of the message contains header information.
  • Body: This field is mandatory. Contains body of the message comprising of call and other information needed for execution such as input parameters. The response body contains the relevant information needed by the SOAP client.
  • Fault: This is an optional field providing information about the exceptions occurred during processing of the message.

Below figure shows the SOAP fault example:

SOAP_Message_inputXml_WithFault

Advantages

  1. Platform independent
  2. Language independent
  3. Different transport protocols can be used. Standard stacks use HTTP but others such as SMTP can also be used.
  4. SOAP based web services are useful when below points are required:
    • Asynchronous processing
    • Reliability
    • Stateful operations where state of the web service is needed in subsequent operations.

Disadvantages

  1. Slower than other middleware technologies because of verbose XML format used by SOAP
  2. There will be some firewall latency added as the firewall will analyse the HTTP transport. This is because the firewalls might not understand the difference between HTTP/Web browser and HTTP/SOAP

Web services – Introduction


Enterprise software architectures have been using many ways of communication technologies in order to share data or business rules between applications. One of them is to define an integration layer to coordinate the communication between the systems. Service oriented architecture (SOA) is another way of integration. Choosing between the different integration techniques depends on the requirements.

SOA (Service Oriented Architecture)

As per the open group’s definition, "Service-Oriented Architecture (SOA) is an architectural style that supports service-orientation." Here integration of several different applications is achieved through collection of independent services. A service is a self-contained,  well-defined and loosely coupled units of functionalities. An example of a service could be "create order service" for an Order Management System which creates the order in the system taking inputs such as line items, price, payment methods and customer details, then gives the output as order number.

Web Service

Web service is a piece of software function that uses XML messages for communication and made available over the internet. Since it uses XML as a standard way of communication it is independent of language or platform. For example an application deployed on windows operating system can talk to another one on Unix. Application developed using Java can communicate to that one with Python.

soa_image

Web Service Components

  • SOAP (Simple Object Access Protocol).  Protocol specification that uses HTTP for an XML message transmission.
  • WSDL (Web Services Description Language). Used to describe the functionality offered by a web service.
  • XML (Extensible Markup Language). Markup language used for encoding documents. Used for input and output of web services.
  • UDDI (Universal Description, Discovery and Integration). Using UDDI business can publish and discover what services are available.

Web services provide interfaces for communication. Software developers can use these and integrate them with their application. They do not provide any graphical user interface but they share business logic.

Example:

Let us consider the example of an Order Management System. This system integrates with e-commerce web site where customers place orders. The programming logic is written in Java and deployed on a Unix machine. Customers place the orders from a browser running on a windows machine.

Steps are as below:

  • Customer opens the e-commerce web site
  • Searches for a product and places an order
  • Application bundles the order information into a SOAP message
  • The message (Request) is sent to the order management system’s “createOrder” service
  • Order gets created in the system
  • Order number is sent back by the service as an output (Response)